 Save to Pinterest
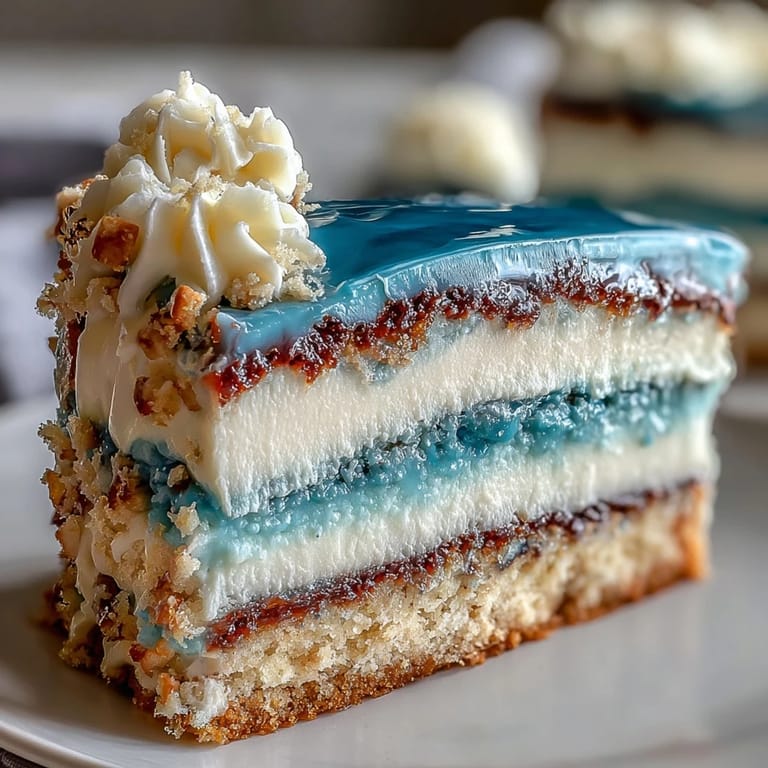
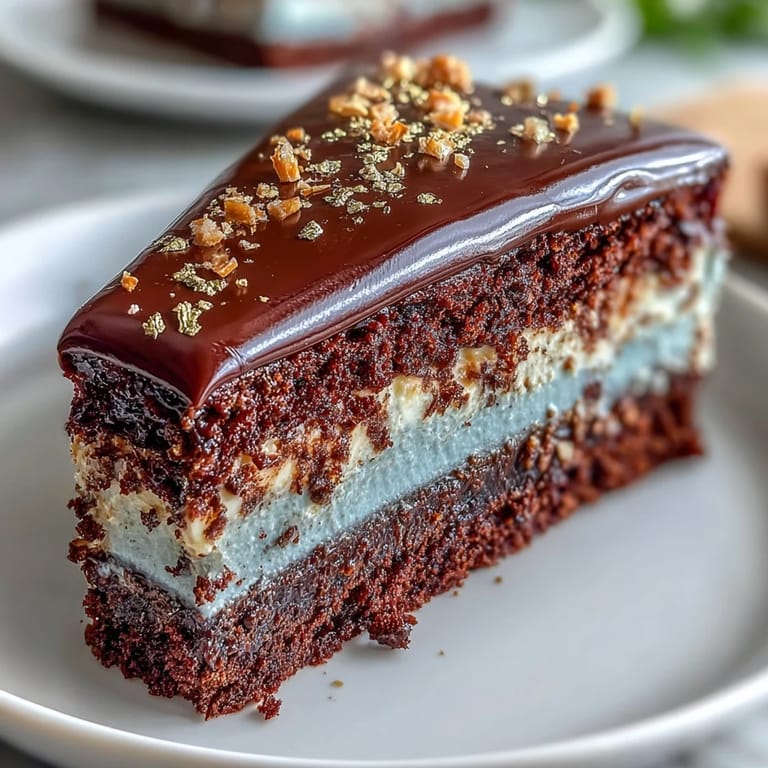
 When I first set out to create a graduation cake for my nephew, the kitchen felt electric with anticipation. I could sense the momentous occasion coming through in every egg cracked and swirl of deep blue food coloring. There's something thrilling about making an ombre cake: each layer promises a little surprise, and the final reveal is always more dramatic than you expect. I found myself humming "Pomp and Circumstance" while measuring flour, hoping the cake would feel as grand as the ceremony itself. The splash of edible gold was just the crown this celebration needed—I couldn't resist that final touch.
We crowded the kitchen on graduation day, each person sneaking peeks at the layers as they cooled. My brother joked about the gold accent being "fit for royalty", and when we sliced the cake later, every piece got a chorus of "oohs" and "aahs". I remember pausing to catch the shimmer of gold leaf under afternoon sunlight, and thinking how the colors almost echoed the grad's school uniform. Everyone claimed a corner with extra gold—it was definitely the hit of the party. Decorating together felt more like a team effort than a solo bake.
Ingredients
- All-purpose flour: Sifting helps ensure the cake layers stay light and airy; don't skip this step if you want a plush crumb.
- Unsalted butter: Using it at room temperature makes for smooth batter and creamy frosting.
- Granulated sugar: Creaming it well with butter was the secret to those perfectly tender cakes every time I made it.
- Eggs: Room temperature eggs blend smoothly for a uniform texture; set them out ahead.
- Pure vanilla extract: Adds warmth and depth—don't be shy with it in both cake and buttercream.
- Whole milk: This keeps the cake moist and gives a more rich flavor; cold milk results in tougher texture.
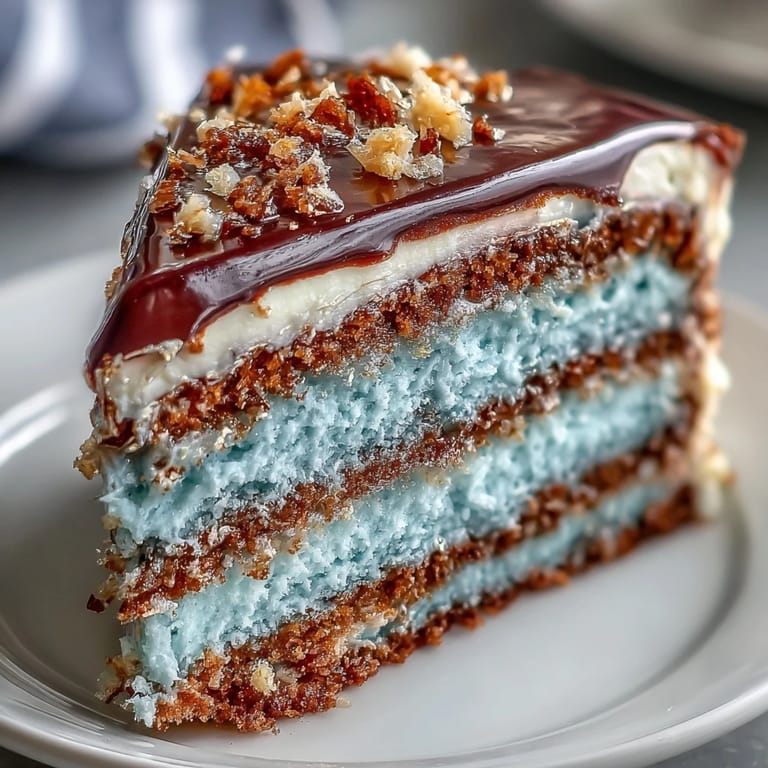
- Blue gel food coloring: Gel concentrates make the colors bold without thinning the batter. Layering from light to navy creates the ombre magic.
- Powdered sugar: Sift before mixing to avoid lumpy frosting.
- Edible gold leaf or gold dust: I learned quickly to handle with dry hands and gentle touches—otherwise it tears.
Tired of Takeout? 🥡
Get 10 meals you can make faster than delivery arrives. Seriously.
One email. No spam. Unsubscribe anytime.
Instructions
- Prep Your Pans:
- Grease and line three 8-inch cake pans with parchment so the layers release effortlessly. You'll hear the pans clink as you drop in the paper, a sign you're starting something special.
- Combine Dry Ingredients:
- In a medium bowl, whisk flour, baking powder, baking soda, and salt; your nose will catch the faint nutty scent of the flour as it aerates.
- Cream Butter and Sugar:
- Beat butter and sugar till pale and fluffy—the sound changes from rough to smooth, a cue it's ready.
- Add Eggs and Vanilla:
- Add eggs one by one, each time seeing batter go silkier; stir in vanilla for a subtle aroma that fills the air.
- Alternate Flour and Milk:
- Switch between adding dry mix and milk, starting and ending with flour; the batter thickens just right, and each addition brings more unity to the mix.
- Create Ombre Batter:
- Divide batter into three bowls and tint with blue gels, working from pale to deep navy. Take care with each swirl to get the shades distinct—your spoon is your paintbrush.
- Bake and Cool:
- Pour colored batters into pans, smooth, and bake till a toothpick comes out clean. Cooling on racks fills the kitchen with gentle vanilla steam.
- Make Vanilla Buttercream:
- Beat butter until creamy, then add powdered sugar slowly, watching texture turn billowy. Add vanilla, salt, and milk for the perfect consistency—don't rush this step.
- Prepare Blue Frosting:
- Reserve one cup for crumb coat; tint the rest with dark blue gel for that striking outer layer.
- Assemble Layers:
- Level and stack from darkest to lightest, spreading buttercream between each layer. The cake starts to look like a piece of abstract art as you go.
- Apply Crumb Coat and Chill:
- Cover the whole cake in a thin layer of plain buttercream and chill—patience gives you a smooth finish.
- Frost and Blend Ombre:
- Frost with blue buttercream and blend lighter shades toward the top for ombre. Use an offset spatula in long swipes, listening for the soft scrape as you smooth the sides.
- Gild With Gold:
- Add gold leaf or paint gold dust in streaks; the metallic shimmer lights up the cake instantly. Handle gold very gently—it's extra fragile.
- Chill and Serve:
- Chill the cake until ready to serve, so the colors deepen and the buttercream firms up beautifully.
 Save to Pinterest
 Watching the graduate's face light up when he saw the ombre layers and gold accents reminded me that this cake isn't just dessert—it's a centerpiece for celebrating hard work and new beginnings. Guests took photos, and the leftover crumbs felt like memories from a day well-spent together.
Mastering Ombre Layering at Home
In my experience, dividing the batter into separate bowls lets you customize those gradients just right, but sometimes the colors blend if you overmix. Be gentle with your strokes and don't hesitate to adjust shade during mixing. I always prep extra bowls and spoons so mixing is stress-free and keeps colors from muddling. Small bowls work better than large for controlling tint strength. Taking your time with each layer results in the biggest wow factor when you cut.
Decorating with Edible Gold Made Simple
Edible gold can feel intimidating, but it's surprisingly forgiving if you have a steady hand and a small brush. I discovered that working near a bright window makes every shimmering touch easier to see and perfect. Gold leaf is delicate—don't press too hard, or you'll end up with flecks instead of streaks. Clearing a tidy workspace matters as any crumb can stick to the gold. Using just a splash of clear alcohol with gold dust gives you more control as you paint.
Troubleshooting Cake Layers Like a Pro
I can't count the times I've had uneven layers or crumbly edges after rushing the cooling. Leveling your cakes with a steady serrated knife is worth every minute for that perfect stack. If the cake is sticky, pop it in the fridge first to firm up. Skipping parchment makes release a nightmare—don't chance it. Patience is truly your friend here.
- Let all ingredients come fully to room temperature for consistency.
- If you see bubbles while pouring batter, tap pans against the counter to dispel.
- Don't forget to chill your assembled cake for at least 20 minutes before the final frosting layer.
 Save to Pinterest
 This cake brings out everyone's inner artist and marks milestones with style—I hope your celebration feels just as bold and sweet as mine did.
Recipe Questions & Answers
- → How do I achieve the ombre effect in cake layers?
Divide the batter into separate bowls and tint each with increasingly darker blue shades, then bake each layer individually.
- → What is the best frosting for this layered cake?
Vanilla buttercream works well, providing a rich, creamy texture that complements the cake and helps blend ombre colors.
- → How do I decorate with gold accents safely?
Use edible gold leaf or gold dust specially made for culinary use; check packaging for allergen and safety information.
- → Are graduation-themed decorations required?
While not necessary, toppers or chocolate stars elevate the celebratory vibe and personalize the presentation.
- → Can I make the cake in advance?
Yes, prepare layers and buttercream a day before, then assemble and decorate on celebration day for best freshness.
- → Which tools help with smooth frosting and ombre blending?
An offset spatula and cake turntable are useful for even frosting and gentle color blending across the cake surface.