 Save to Pinterest
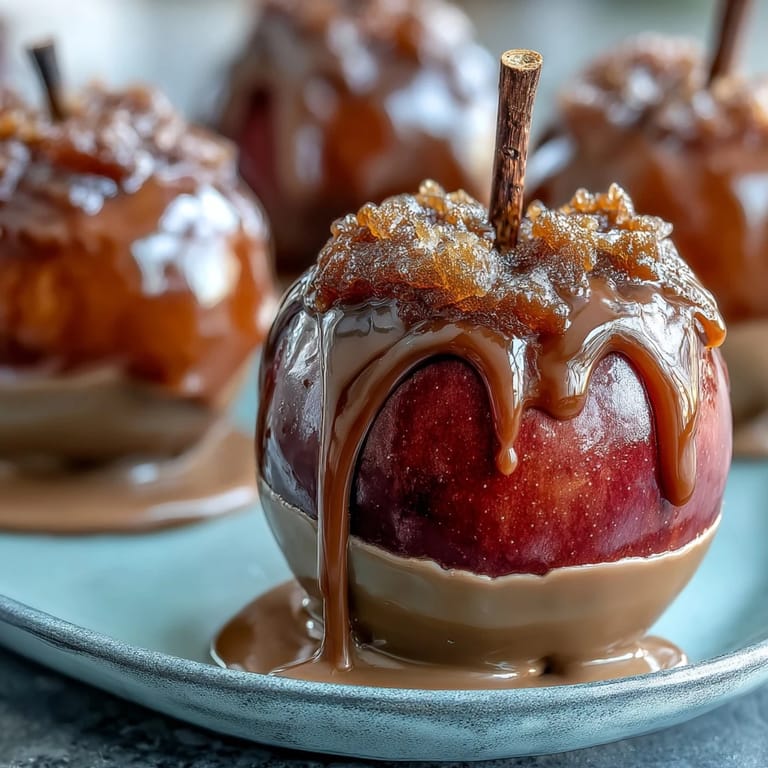
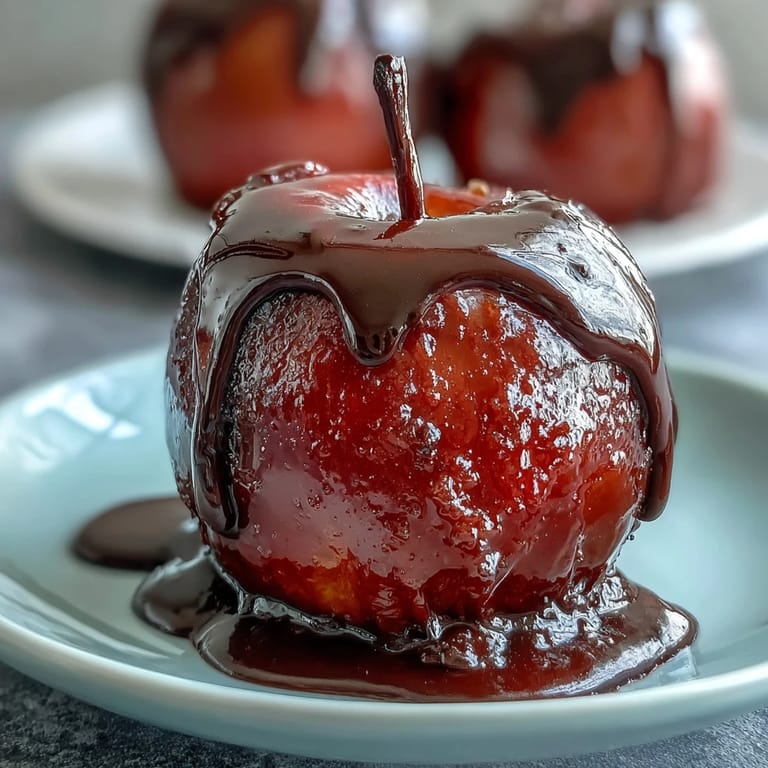
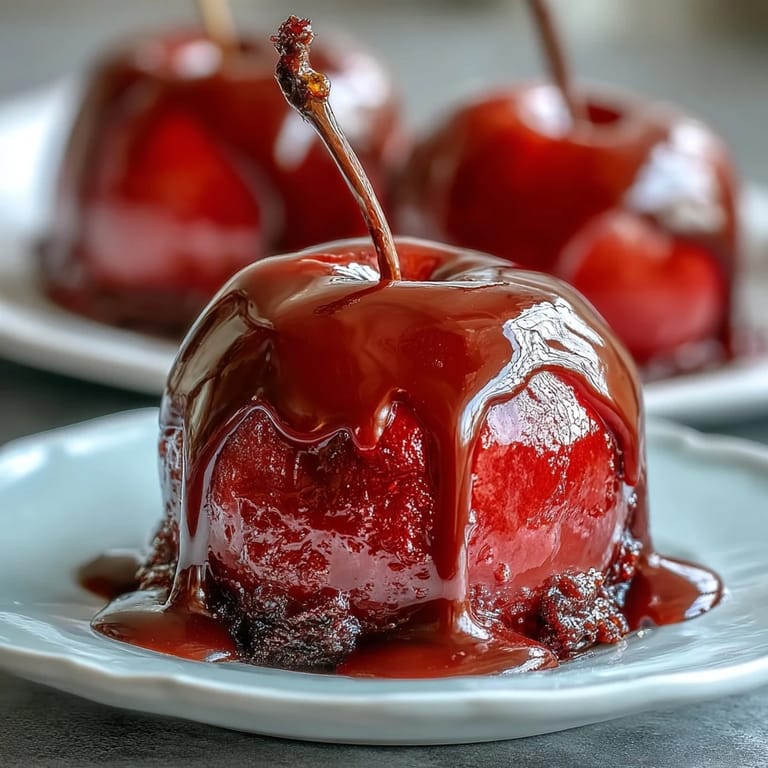
 There's something about the smell of hot sugar bubbling on the stove that makes me feel like a kid again, even though I'm standing there with a candy thermometer watching numbers climb. My neighbor once handed me a homemade candy apple at a harvest fair, still warm, the red coating crackling between my teeth, and I spent the next week trying to reverse-engineer it in my kitchen. Now these shiny red apples with their delicate white chocolate drizzle have become my answer to anyone asking what to bring to a gathering—they're equal parts impressive and comforting, a little bit retro, and absolutely impossible to resist.
I made a batch for my partner's office potluck last autumn, and I'll never forget watching three people eat theirs before the meeting even started. One coworker came back asking for the recipe, saying it reminded them of state fairs and simpler times. That's when I realized these aren't just candy apples—they're small edible memories that somehow make people smile before they even take a bite.
Ingredients
- Granny Smith or Gala apples (8 small to medium): Granny Smiths give you that tart-sweet contrast that makes the candy coating really shine, though Galas work beautifully if you prefer something sweeter—just make sure each one is completely dry or the candy won't stick properly.
- Wooden sticks (8): Craft or popsicle sticks become your handle, so push them firmly into the stem end and don't be shy about it.
- Granulated sugar (2 cups): This is the foundation of your candy shell—it needs to dissolve completely and then crystallize into that signature hard crack stage.
- Light corn syrup (1/2 cup): This prevents crystallization during cooking and keeps your candy coating glossy and smooth instead of grainy.
- Water (3/4 cup): Use filtered water if you have it, as mineral content can affect how the sugar behaves.
- Red gel or liquid food coloring (1/2 tsp): Gel coloring gives you that jewel-like red without adding excess liquid that could throw off your temperature readings.
- Cream of tartar (1/8 tsp, optional): This ingredient is a small miracle worker—it helps keep your candy smooth and prevents unwanted crystallization, so I never skip it.
- White chocolate (3 oz, chopped or chips): Quality matters here since this is the finishing touch; cheaper white chocolate can taste waxy, so invest a little.
- Coconut oil or vegetable oil (1 tsp, optional): A tiny bit of oil makes the white chocolate drizzle flow more smoothly and look more professional.
Tired of Takeout? 🥡
Get 10 meals you can make faster than delivery arrives. Seriously.
One email. No spam. Unsubscribe anytime.
Instructions
- Set up your workspace:
- Line a baking sheet with parchment paper and lightly grease it, then insert a wooden stick firmly into the stem end of each apple—you want these secure because you'll be dunking them in molten sugar. Place the apples nearby so they're ready to go when your candy reaches temperature.
- Combine the candy ingredients:
- Pour sugar, corn syrup, water, and cream of tartar into a heavy-bottomed saucepan and stir gently until the sugar starts to dissolve. This is the only time you'll stir, so make sure everything is combined before the heat goes up.
- Heat without stirring:
- Set the pan over medium heat and clip your candy thermometer to the side, making sure it's not touching the bottom. Let it boil without stirring further—stirring now can cause crystallization and ruin your whole batch, so resist the urge.
- Add color at the right moment:
- Once the mixture hits 250°F (121°C), add your red food coloring and gently swirl the pan to mix it in without stirring. The color will distribute beautifully through the hot sugar if you let gravity do the work.
- Reach hard crack stage:
- Continue boiling until the candy reads 300°F (149°C) on your thermometer—this is that magical hard crack stage where your coating will be crisp and snappy. Watch it carefully in those final minutes because candy temperature can jump quickly, and you'll want to pull it right at 300°F.
- Dip with confidence:
- Remove from heat immediately and working quickly but carefully, tilt the pan and dip each apple into the hot candy, turning it to coat evenly. Let excess drip off for a second or two, then place it on your prepared baking sheet—the coating will feel soft now but will harden as it cools.
- Let the coating set:
- Give the candy apples about 10 minutes to cool and harden completely; you'll feel them go from slightly tacky to satisfyingly crisp. While you're waiting, you can prep your white chocolate.
- Melt the white chocolate:
- Chop or measure your white chocolate into a microwave-safe bowl and heat it in 20-second bursts, stirring between each burst until it's completely smooth. If you're using the coconut oil, add it during the final burst so it incorporates smoothly.
- Drizzle with style:
- Using a spoon or piping bag, create delicate drizzles of white chocolate across each cooled candy apple—less is more here because you want people to see that beautiful red underneath. Let everything set for 10 minutes before serving or wrapping.
 Save to Pinterest
 I once made these for a children's Halloween party, and the moment a five-year-old took that first crunch and her eyes lit up was worth every careful degree of temperature watching. Those apples disappeared in about fifteen minutes, and two parents asked me to make them for their own family traditions—that's when I knew I'd found something special.
Making Them Ahead
One of my favorite things about candy apples is that they actually improve with a little time because the coating becomes even crispier and the flavors settle. You can make them up to three days ahead and store them in an airtight container with parchment between layers—they'll be waiting for you when you need them, ready to impress.
Creative Add-Ons
After that first batch, I started experimenting with mix-ins right after dipping, and the possibilities are genuinely fun to explore. While the candy coating is still slightly tacky—usually within the first 30 seconds after dipping—you can roll the apples in chopped nuts, sprinkles, crushed candy canes, or edible glitter for totally different effects. Just make sure whatever you're adding is completely dry, or it'll slide right off into the bottom of your bowl.
Troubleshooting and Tips
The most common mistake I see is impatience—people rush to dip before the candy has cooled enough, which creates a thin, uneven coating. If your candy gets too cool and thick while you're dipping, you can gently reheat it for a few seconds over low heat to bring it back to workable temperature. Keep a glass of water nearby for dipping your hands because that hot candy sticks, and a quick rinse makes cleaning up so much easier.
- If you're serving these to people with dairy allergies, use vegan white chocolate for the drizzle instead.
- For extra security, let each apple cool on the baking sheet before moving it, or the candy coating might crack.
- These are best eaten within a few hours of adding the white chocolate drizzle, when everything is still crispy and fresh.
 Save to Pinterest
 These candy apples have taught me that sometimes the simplest treats carry the biggest joy, and that's why I keep making them. Whether you're bringing them to a gathering or eating one quietly in your kitchen, they're a small moment of pure happiness.
Recipe Questions & Answers
- → What type of apples work best for this dessert?
Firm, tart apples such as Granny Smith or Gala are ideal for holding the candy coating and offering a crisp bite.
- → How do I ensure the candy shell sets properly?
Make sure apples are completely dry before dipping. After coating, allow them to rest undisturbed for about 10 minutes to harden.
- → Can I add toppings to the candy apples?
Yes, try sprinkling chopped nuts or colorful sprinkles over the candy while it's still warm for extra texture and flair.
- → What is the purpose of the cream of tartar in the candy mixture?
Cream of tartar helps create a smooth, stable candy coating by preventing sugar crystallization during cooking.
- → How should I melt the white chocolate for drizzling?
Melt the white chocolate gently in short bursts in the microwave, stirring frequently to avoid burning. Adding a small amount of oil can help achieve a smooth drizzle.
- → Are there dairy-free alternatives for the drizzle?
Yes, vegan white chocolate can be used as a substitute to accommodate dairy-free preferences.